Valentine STEM: Light-Up Circuit Valentines

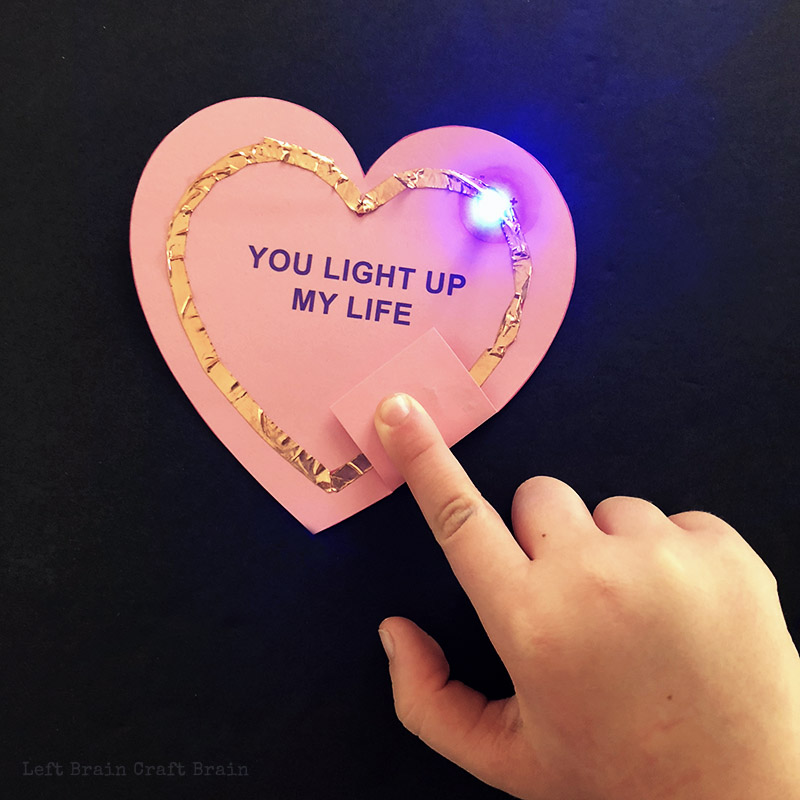
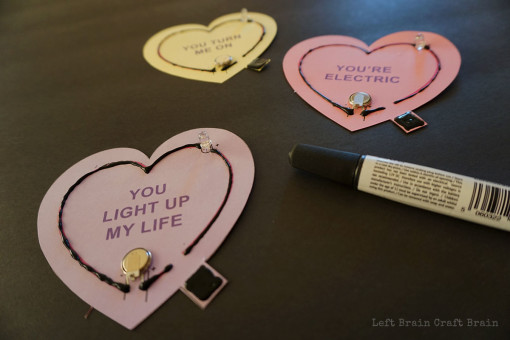
Did you know that you can paint on an electrical circuit?  Neither did I until I stumbled across some electric paint a few months ago. And it’s as easy to use as glitter glue.  Really.  Ever since I found it, I’ve been dreaming up projects… Valentine stem projects like these Light-Up Circuit Valentines.  They’re conversation hearts with their very own LED & battery, made just for the light of your life. For Valentine’s Day or any other day, you want to show your love. This post contains affiliate links.

Build a light-up Valentine with this free conversation heart printable, electric paint & LED's. Great STEM activity for aspiring electrical engineers.

How to Make Light Up Valentine Circuits

Definitely don’t be intimidated by these Valentines! Kids all over the world have made these in class, at home, after school, in scouts, at libraries, and more. All you need are a few supplies and this helpful printable template. To grab the template, just fill out the form and it will be emailed to you.

Light-Up-Circuit-Valentines-680x450
Light-Up-Circuit-Valentines-800x800

FREE! PRINTABLE VALENTINE
CIRCUIT CARD TEMPLATE

!
!
Terms and Conditions checkbox is required.
Something went wrong. Please check your entries and try again.

Coin Cell Battery Safety

Coin cell batteries pose a serious risk when swallowed and should not be used or stored within reach of small children. This project is intended to be performed under adult supervision. Appropriate and reasonable caution is recommended when activities call for any items that could be of risk, including, but not limited to: sharp tools, hot glue, chemicals, batteries, scissors, and small items that could present a choking hazard. If you are unsure of the safety or age appropriateness of an activity, please consult your child’s doctor.

Copper Tape Light Up Valentine Circuits Update

I’ve heard from a lot of you that it’s hard to get the pin batteries these days. So I’ve updated the template so you can use copper tape and standard CR2032 batteries.

Copper Tape Light-Up Circuit Valentines Supplies Needed

Here’s what you need to buy (be sure to grab the free printable, too by filling out the form at the top of this post):

How to Make Copper Tape Light Up Valentine Circuit Card

  1. Have the template emailed to you by filing out the form on this page. Print out the template and then cut along the outer pink heart line.
  2. Build the circuit:
    • Bend the leads on the LED at a 90-degree angle so that they can lay flat against the cardstock. If the leads are too long to follow the heart line, you can cut them shorter, but make sure to keep the positive lead longer for easier building.
    • Now for the copper tape… Always try to use long continuous sections of copper tape without breaks. If it does break, give about an inch of tape overlap with the next section.
    • Tape the positive LED lead with copper tape so that it secures the lead to the card and travels down the right side of the heart, all the way to the switch tab battery section.
    • Repeat with the negative LED lead and tape down the left side of the heart to the positive battery circle.
    • Place the battery with the positive side up and close the card. You can secure the battery to the card with a loop of copper tape or a piece of clear tape. To turn on the card, close the switch with your finger or paper/binder clip.

And back to the original post….

DIY Light-Up Valentines

OK, I’m going to be honest here.  This is one of my absolute favorite projects that we’ve done at Left Brain Craft Brain. I always joke that if something is shiny, I want it.  If it lights up, even better.  My daughter gathers light-up toys and glow sticks at an alarming rate simply because I love them too.  So when I had the chance to do a Valentine’s stem project that lights up, I was all over it.

Painting the Circuits Left Brain Craft Brain

It’s often hard to find simple technology projects to round out STEM / STEAM learning, but this Valentine stem project is truly easy enough for a kiddo to do.  My preschooler needed a lot of hand-holding, but an early elementary-aged child could do this all by themselves.

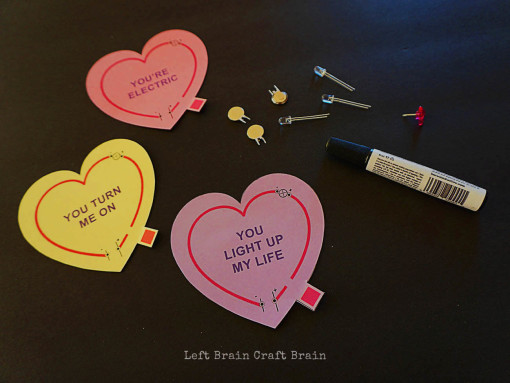
Light-Up Valentines Supplies Needed

Valentine Circuits Supplies Left Brain Craft Brain 2

Light-Up-Circuit-Valentines-680x450
Light-Up-Circuit-Valentines-800x800

FREE! PRINTABLE VALENTINE
CIRCUIT CARD TEMPLATE

!
!
Terms and Conditions checkbox is required.
Something went wrong. Please check your entries and try again.


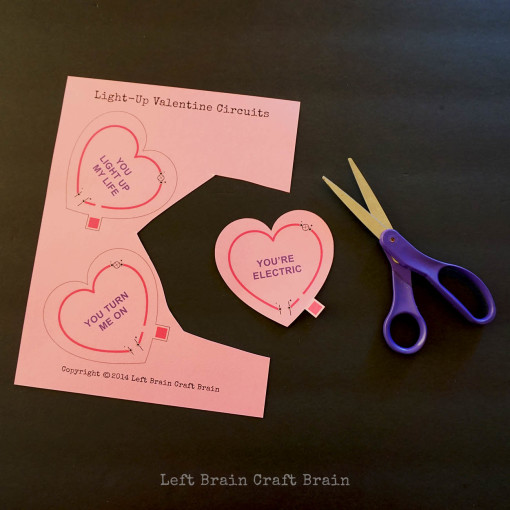
  1. Print and cut the Valentines: Print out the free Light Up Valentine Circuits Printable. Cut out hearts along the black outer heart-shaped line, making sure to cut out the square part on the lower right as well.  This will be the switch for the Valentine.
Valentine Circuit Printable Left Brain Craft Brain
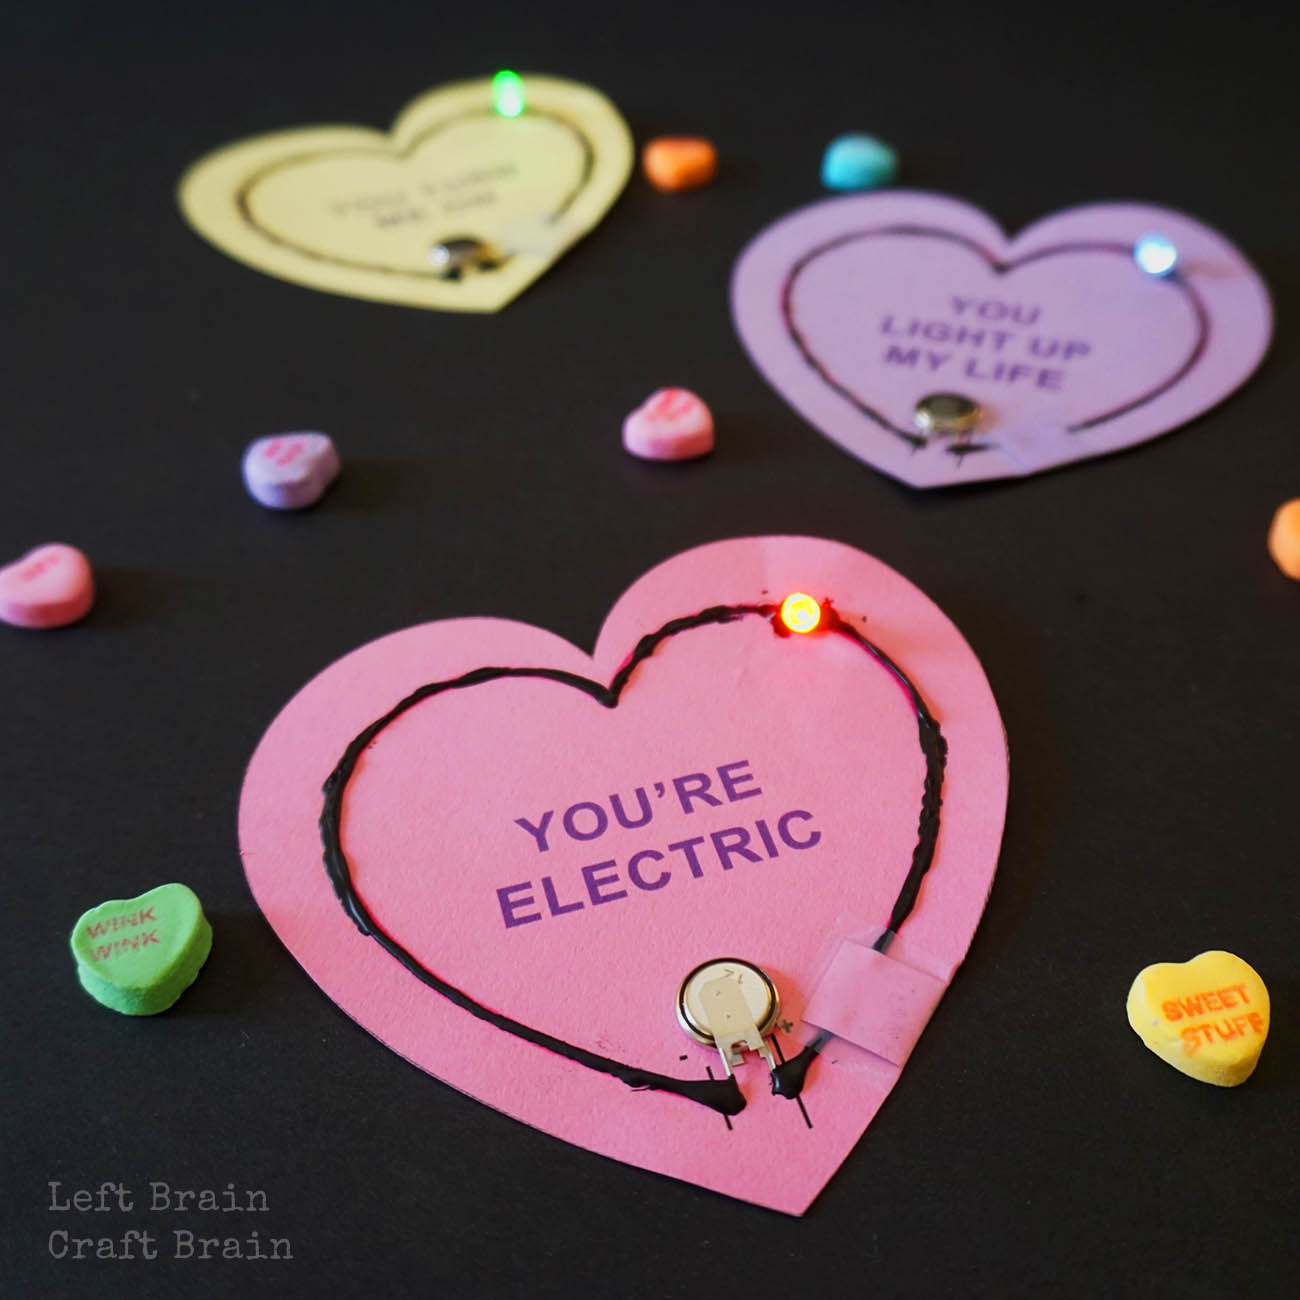
  1. Insert the LED: First poke two holes in the card with a push pin, one at each black dot near the circle with an x in it.  This is the symbol for the light.  Then insert the LED, making sure that the long pin is inserted into the hole with the + sign.  Fold the wires flat on the back of the card.
  2. Add the battery and paint the heart circuit: Place the battery as shown on the Valentine with the positive pin aligned with the plus sign.  Please note, coin cell batteries are hazardous if swallowed so be sure to keep these away from kiddos that still put things in their mouth.
  3. Start painting the electric paint along the pink inner heart line.  You don’t need a super heavy line (this isn’t puffy paint), but be sure you get a continuous line of the paint that’s about as wide as the pink line.  If the line is too thin, the LEDs don’t get enough power.  Do not fill in the area where the battery or LED go, or the blank spot by the switch.
Apply Electric Paint Left Brain Craft Brain 2
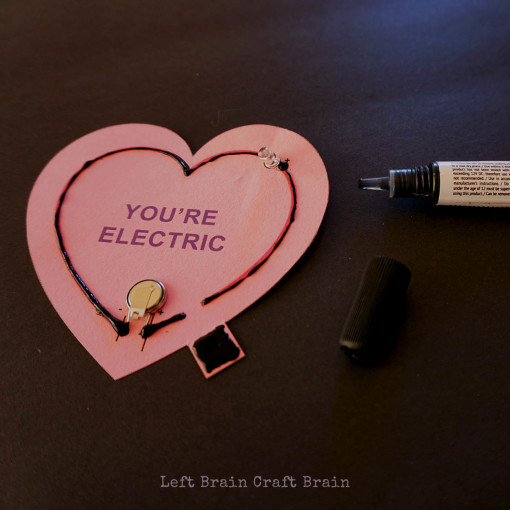
  1. Paint the switch:  Fill in the pink square with electric paint.  Use just enough to cover the square with a light layer.  It’s really easy to use too much here which makes it take forever to dry.
  2. Let it dry:  Let the conductive paint dry.  The paint instructions said 15 minutes, but I must have applied a heavier layer so it took a few hours.  The paint becomes fully conductive only when it’s completely dry.
Electric Paint Drying Left Brain Craft Brain
  1. Light it up:  To turn on the Valentine, fold the switch over so that it completes the circuit.  The LED will glow.
Light up Valentines Left Brain Craft Brain
Circuit Valentines Left Brain Craft Brain FB Final

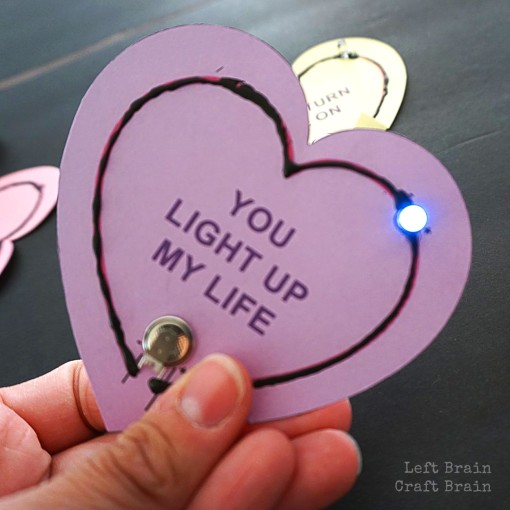
You know why else I love this project?  My daughter definitely lights up my life :)

Holding Valentine Left Brain Craft Brain

More Hands-on Valentine STEM Projects for Kids

If you love this, you’ll love these, too!

25+ Valentine Process Art Projects for Kids

25 Valentine Process Art Projects for Kids

Valentine's Day Science, Tech, Engineering, Art, and Math Fun for Kids

Looking for ways to show your love for STEAM? Instant gratification style? Check out STEAM Kids Valentine's Day! It’s packed with 14 heart-inspired activities that will wow the boredom right out of your kids.

UPDATE:  A few people have asked me about where to get the batteries.  I’ve linked above to Amazon because it’s the easiest way to get all of the supplies together

. You can see a list of all of our circuit card recommendations HERE.

Light-Up-Circuit-Valentines-680x450
Light-Up-Circuit-Valentines-800x800

FREE! PRINTABLE VALENTINE
CIRCUIT CARD TEMPLATE

!
!
Terms and Conditions checkbox is required.
Something went wrong. Please check your entries and try again.

79 thoughts on “Valentine STEM: Light-Up Circuit Valentines”

  1. This is so awesome! The batteries are really pricey–the link shows $7.29 each–do you think any other kind of battery would work?

    1. leftbraincraftbrain

      Hi Karen– I just added a link to an alternate battery source at the bottom of the post. You can find them for $2 or less plus shipping depending upon the quantity you are purchasing. You’re right, Amazon was expensive.

  2. Pingback: Valentines Day Learning Activities - One Time ThroughOne Time Through

  3. Hands down this is the COOLEST thing I’ve seen on the web in ages. AWESOME job–totally inspired me to chat with my kids about how we can make these for their Valentines this year! THANK YOU!

  4. Is the affiliate link for the battery the price for just one battery? I like the idea a lot but those batteries are pricy if that is the cost of just one?

    1. leftbraincraftbrain

      Hi Mary, I just added a link to an alternative battery source at the bottom of the post. I got my batteries at Mouser Electronics for less than $2 apiece plus shipping. For some reason Amazon doesn’t have too many options for these…

  5. This is great!!! My son’s class just started a unit on electricity so this would be perfect timing at Valentines. How many circuits can you do with the 1 pen?

    1. leftbraincraftbrain

      Thanks so much! I’ve done about 5-6 Valentines plus another project (coming to the blog tonight!) and the pen is starting to feel low. I was probably a little heavy handed with the paint, too.

    1. leftbraincraftbrain

      Hi Kara– Thanks so much for the suggestion. I was debating between the two when I bought the paint. I ended up with the paint because my daughter is used to using glitter glue and I thought the thicker substance would slow her scribbling down :) The scribe pens are next on the list.

  6. Pingback: Light Up Circuit Valentines | Left Brain Craft Brain | The Art of Science

  7. Pingback: Fight Summer Brain Drain with Educational Camps - Left Brain Craft Brain

    1. leftbraincraftbrain

      Either one is fine. I actually built the Valentines with a 40mAh from Mouser but they are low in stock at Mouser. You’ll likely get a bit more battery life from the 120mAh but not enough to make up the price difference.

  8. I LOVE this idea. I am a little sad though- as I would love to do it with my 6 year old who would go bonkers for the valentine circuit, but there is a danger of little ones ingesting these button batteries, and I have a 2 year old who is interested in putting things in her mouth. Maybe you want to add a caution about keeping this project out of the reach of little ones?

    1. leftbraincraftbrain

      Hi Lisa– Glad you like the idea. There is a caution in the project about the button batteries, but I appreciate the reminder. Safety first!

  9. Pingback: Light up Valentines for kids with STEM sense

  10. My girls would love this! However I am out of time to order supplies, get them made, and send them in time for Valentines’ Day. Any idea what type of store I could get the batteries, lights and circuit paint locally? A hardware store? A hobby supply store? Thanks!

    1. leftbraincraftbrain

      Hi Megan. Try Radio Shack. They definitely have the paint because i bought some there. They should have the LEDs and their staff can probably recommend a battery replacement if they dont have the pin batteries.

  11. How do you attach the battery to the paper? Is there a preferred method? Also, what connects the battery to the circuit? The battery purchased through Amazon just has a bottom stem – no apparent wires to bring down to the circuit. Thanks!

    1. leftbraincraftbrain

      Hi Kristina- The paint serves as glue as well as the circuit. I found that if there was enough paint to make the circuit complete, the battery was solidly held to the paper.

      The battery should have what look like two pins coming out the bottom of it. Those are the circuit contacts. The one that comes off the side with the + sign is the positive contact. You can bend them slightly so they make contact with the paper. Then put the paint on. The paint acts as the wires.

      Feel free to email me at leftbraincraftbrain at gmail dot com if you have further questions.

    1. leftbraincraftbrain

      I didnt use the resistors just oit of simplicity. You can save them for another project.

  12. Can you post a picture of the backside?
    I bought all the supplies, and they are not working. Any trouble shooting tips?
    I can tell the batteries are working, because when I make the battery touch the lights we get light. But not when they are part of the card.

    1. leftbraincraftbrain

      Hi Caren- I don’t have a picture of the backside available. But its’s not very interesting. All you see is the LED contacts sticking theough. If you want, you can tape them down. All of the paint and battery elements are on the front of the heart.

  13. FYI, my daughter is an industrial design student. She has found that buying small toys and “tchatchkees” form dollar stores , breaking them down into their parts and utilizing their LED’s in other projects is the cheapest and easiest way to go.

  14. Pingback: Light Up St. Patrick's Day Card - Left Brain Craft Brain

  15. Pingback: “Making” Through Thrifting | julierigling

  16. Pingback: How to Save for STEM Education - Left Brain Craft Brain

  17. Pingback: Teen Services Underground | Valentine’s Day Activities for Teens

  18. Pingback: 16 Creative Kids Valentine Ideas - Pretty My Party

  19. I can’t wait to spend some time doing this project with my grandson. It is right up his alley. This is going to be fun! now, for gathering the materials. Thank you so much for sharing your wonderful idea.

  20. Pingback: DIY Rocket Valentines for Kids - Left Brain Craft Brain

  21. Pingback: 50 Valentine's Day Crafts & Activities! • Melissa & Doug Blog

  22. Pingback: 25 Fun Valentine Crafts to do With Kids - Operation $40K

  23. Pingback: Tech for STEAM Learning, Play, and Programming - ALSC Blog

  24. Pingback: Stamp Blog

  25. Pingback: Simplification Blog

  26. Hi! I signed up to receive the printable for this Valentine, but I’m getting a different printable in my email – the 100 Invitations to Build one. Is there another way to access this printable? I’d like to feature it in a Valentine round-up in January but want to make sure the printable will work. :) Thanks!

  27. Pingback: 30+ Easy Valentine's Day DIY Ideas & Tutorials for Kids - Crafts Booming

  28. Pingback: Ingenious School Valentine Ideas For Classmates and Friends

  29. Pingback: Easy Valentines Day Science Projects - Red Ted Art's Blog

  30. Pingback: 7 Super Awesome Valentine's Day Crafts for Parents & Kids - Savvy Every DaySavvy Every Day

  31. Pingback: 10+ Super Cute Valentine Cards You Can Make With Your Kids

  32. Pingback: 21 Handmade Valentine's Day Cards | Peace but Not Quiet

  33. Pingback: 9 Valentine's Day Science Activities to try with kids

  34. Pingback: 20+ Technology Projects for Kids They'll Love - Left Brain Craft Brain

  35. Pingback: How to Make a Light-Up Paper Circuits School Bus Card - Left Brain Craft Brain

  36. Pingback: Valentine STEM: Light-Up Circuit Valentines • Little Genius International Kindergarten and Educational Center

  37. Pingback: 16 Creative DIY Valentine's Day Gifts for Him or Her - Ten Catalog

  38. Pingback: Valentine's Day STEM Activities - INSPIRATION BLOG

  39. Pingback: 23 Awesome STEAM Activities for Valentine's Day | A2Z Homeschooling

  40. Pingback: 50 Tips, Tricks, and Ideas for Teaching STEAM – educationbuzz

  41. Pingback: Printable Valentine Cards for Kids Who Love STEM and STEAM - Left Brain Craft Brain

  42. Pingback: Fuzzy Heart Monster Backpack Charms - Left Brain Craft Brain

  43. Pingback: Try these DIY Valentine's Day Gifts - Learn Robotics

  44. Pingback: 20 STEM Valentine’s Day Activities for Kids

  45. Pingback: 15 Super Cute Valentine’s Day Cards for Kids to Make

  46. Pingback: 30+ Valentine's Day Math Ideas for All Ages

  47. Pingback: Valentine's Day STEM Activities and STEM Projects for Kids - Left Brain Craft Brain

  48. Pingback: Printable STEM Valentines for Kids

  49. Pingback: 6 fun Valentines' Day projects for kids | Elkei Education

  50. Pingback: Free Valentine's Day coloring Book for kids

  51. Pingback: Valentine’s Day STEM Activities | There's Just One Mommy

  52. Pingback: Teacher Approved Valentines Activities For Kindergarten - Simply Kinder

  53. Pingback: STEAM Valentine's Day Projects For Kids | A2Z Homeschooling

Comments are closed.

Scroll to Top